The Professional Webspace of Designer and Illustrator Kevin Cornell:
"Design, Art, and Lackluster Humor."
A Cornell/Dalkner Dissection of Style
Today, we dive back into the subject of Black & White art techniques. In the last article, we explored Woodcut Illustration and Engraving. We begin this article with engraving's doppleganger... Etching.Etching
Now, if you remember, an engraving is done on a zinc or copper plate. All the following methods also employ the same concept for applying ink to paper: darks are formed by the ink caught in recesses on the plate (with a few clever exceptions), while whites are formed by the unmarked or flat areas. So the way these techniques differ from one another, is how you make the recesses.
Let's explore etching. Now — if you were a renaissance artist, but not a very patient one — you'd probably shy away from engraving. Picture yourself walking through the public market, having quite a fanciful outing. "Zounds", you mutter to yourself, "I'm quite tired of spending all my time gouging and scraping like a buffoon! I wish I had more time to spend out here, enjoying my leisure!" And as you walk along, avoiding lepers and plague victims, you come upon your favorite spectacle — a public execution! So you stay to watch. And as they lower that Albigensian, or Moor, or even that Huguenot into the acid vat, you get a brilliant, time-saving idea...
Alright, alright. I may be escaping into fantasy, but it's legitimate fantasy! To put it plainly, instead of using a burin (that sharp metal rod I mentioned in the last article) to create recesses in the plate, the etching process uses acid.
The artist takes a plate, and covers it with a waxy substance called a ground (dependent on how you apply it, it can be referred to as a soft ground or a hard ground). Then using a needle, you scrape away at the wax/ground, exposing the metal. Once acid is introduced, the exposed metal is eaten away, forming the grooves which will be your blacks.
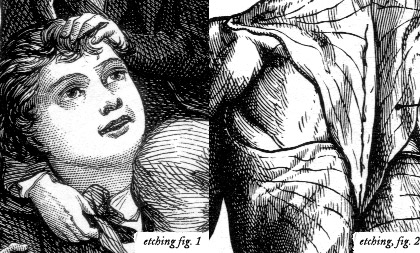
The key to differentiating between an engraving and an etching then, is how the lines are behaving. Freeform lines that twist and turn are easier carved out of wax than metal. If the image in question closely resembles a pen & ink, chances are it's probably an etching. You can especially see the differences in etching, fig. 1. — the skin is engraved, while the clothing and hair are etching. The differences between the two methods do get harder to spot when the artist mimics the parallel linework associated with engraving; in that situation, the "fading-out" effect that engraved lines have might be the best key to isolating technique.
Intagli-WHOA!
Okay. So now we've explored engraving and etching, it's time for me to blow your mind: they're the same thing. All of these processes, with the exception of woodcut, fall into a category of technique called Intaglio (pronounced "intaleo" — the 'g' is silent). I didn't feel the need to burden you with a new vocabulary word until you soaked in some of the basic concepts. But now you have it. Say the word silently to yourself, "Intaglio". Whisper it into your neighbor's ear, while gently stroking their delicate hand, "Innnntaaagggllioooo...". Embellish your dinner order at the fancy italian restaurant... "I will have the... intaglio..."Now let us move into some of the more advanced techniques, variations on engraving or etching. These methods were less popular for commercial printing, because of the delicacy of the final plate. For instance, a drypoint on a zinc plate might only yield 25-30 successful impressions. So keep that in mind when you decide to create mezzotint invitations for your next birthday party, and invite 200 of your closest friends. That 200th printing is going to look pretty poor; and chances are Zoey & Zanzibar Zorba will be so insulted they won't spend more than a couple of bucks on your present... and they'll spit in your cake.
Drypoint
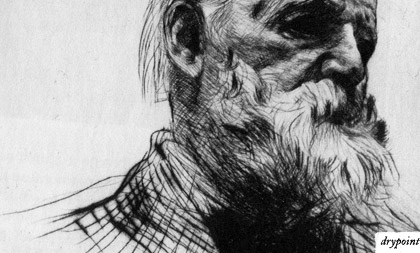
Drypoint is a technique similar to engraving, that can yield an image similar to an etching, while adding it's own special qualities. You see, instead of using a burin to dig metal grooves into the plate, like in engraving, the artist uses a needle. And instead of removing little slivers of metal, when you use the drypoint needle it actually pushes the metal out of the groove, raising it up slightly. So now, you've created a recess to hold ink, and also a raised bit of metal called a "bur" that will hold ink. You're printing the same line twice, you clever dog! As a consequence of this double-line, drypoint strokes will have a velvety softness that an engraving or etching lacks. You can see in the sample above, how the linework on the left is bleeding. This is a signature effect of drypoint.
Aquatint
Now, as I stated in the engraving article, you can't really print large areas of solid black. If you were doing an engraving, or an etching, you'd just have to scratch or gouge out a large area you want very dark with a lot of deep lines. Or... you could aquatint.
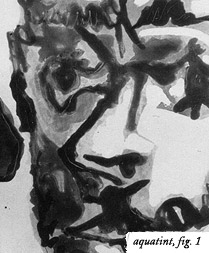
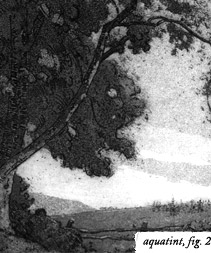
When you aquatint, you take your plate and powder it with rosin, which acts as your "resist". You need a resist, because like etching, you're going to give this baby an acid bath. When the acid hits the plate, it burns everything not covered in powder. What will that do? Now, when you print with this plate, your whites are created by little tiny dots that formed where the powder granules sat. The concept is akin to halftone printing, if you're familiar with modern print methods. The process can even be repeated a couple of times to get variation in tone. Aquatint prints are probably the easiest intaglio method to spot; the finished product often looks like it was done with an inkwash, or watercolor.
It's not uncommon to see aquatint used in conjunction with other intaglio processes. Getting fine detail by making your lines with powder is as difficult as it sounds. Many artists do an aquatint print for tone, and then print an etching or engraving on top of that to bring detail into the image. If you take a look at the aquatint samples, you can see that fig. 1 is pure aquatint, while fig. 2 is an etching with aquatint used for tone.
Mezzotint
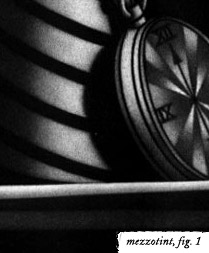

Now... Mezzotint is like some sort of super-hybrid technique. If you had to take any classes on drawing with charcoal, you may be familiar with the concept of a "subtractive" method. What you do in a subtractive drawing is start with a black page, and build your whites out of (or on top of) that. Mezzotinting is really a subtractive method. So the first step in mezzotint is to prepare a plate that prints entirely in black. And if you've been paying attention to this article, you know that means... a LOT of work.
First off, the artist uses a "rocker", a curved and serrated tool meticulously rocked across the plate's surface until a uniform texture of grooves is created. Like in drypoint, each of these grooves is accompanied by an upraised "bur". If you were to print with this plate right now, you'd have a very soft, fuzzy black... Awwwwww. Then, the artist builds in their whites by burnishing or scraping down those burs and grooves. The result is an image of pure tone.
Mezzotints were the reproduction style of choice for portraiture during the Baroque period, around the 1700's. It was as close as you could get to mass-producing a realistic painting, though the print runs were usually pretty small. Mezzotints have a rather limited number of printings before they lose their charm. They are the intaglio equivalent of an uncle who tells you all his jokes right at the beginning of a family reunion. The fun is over pretty quick.
In closing
It's time to bring this exploration of Black & White to a close. Hopefully, with a little practice, you'll be able to identify technique pretty quickly the next time you come across some period imagery. Don't be surprised to find a number of methods used in one image; just like any medium the artist often needs to take a couple different routes to create the image they want.Much thanks go to Peter Dalkner, for sharing his knowledge of the printmaking processes. I'd love to hear from anyone who's familiar with the methods I've described; if you have something to say to give people even more insight, feel free to comment on things.
Hope this has been helpful folks... now, if you'll excuse me, I have to get started on my next thinkpiece: "Which Waffles are better? The Dogs, or the Food?".
Comments on this Article
There are currently 12 comments.
2. bearskinrug
Thanks John!
Crap. If I knew about that book beforehand, it would have saved me A LOT of work!
That class sounds like it would kick ass. You took it at University of Virginia?
3. tony
Things are much clearer for me now. Before I had read this article I thought: its all wood or copper carving or whatever. now I can at least try to see the differences between the apples and pears of 'Intaglio'. Thank you for that.
P.S. what do you usually use when illustrating? just pen & ink or do you actually use brushes and stuff as well? what ink do you use? etcetera....if you're not in the mood to answer all these questions, just don't. But as a beginning artist I intend to learn to indentify (and eventually use) as much as different techniques I can.
5. The Philanthropist
I think the element I like the best out of this whole post is the little glass jar in front of the "black" and "white" books. I can kind of make out the rest of the lettering on the books through the glass. You are a weird freaky genius my friend.
6. jordan
Hm... sorry to ruin your fun, but *my class on charcoal didn't have anything about subtraction.
8. mearso
Great Article again!
My wife is a printmaker, and here medium of choice is etching, though she manages to ink up her plates in color to give a rather nice effect.
Though your article has inspired me to muscle in to her studio, push her aside and get scraping, burnishing and gouging.
9. jessie
Ooh, i love etching. I can't do it very well, but thats another story. Main point: I love it. Like the dark works of Piranesi.
10. bearskinrug
Tony - all will be answered soon, hopefully...
The Philanthropist - Thanks, sir - I like that part too!
Jordan - *pull at collar*, *gulp*. Don't hurt me!
Mearso - This imagery is wonderful! I may have to post this link...
11. Ian
Thanks. This really answers the question I've had about that Photoshop Mezzotint Filter.
12. bearskinrug
Hah! That's not a bad thought, Ian... I've never tried that filter - I wonder how close to a mezzotint it comes?

[ Back to Top ]
Search Bearskinrug:


Other Sections You Might Want To Visit:
- The Downloads Section: Wallpapers for the Discerning Desktop.
- The Links Archive: A Collection of Interesting Tidbits.


1. John Nick
Awesome series, Kevin. Bamber Gascoigne would be proud!
There's a week-long course given by Rare Book School called Book Illustration Processes to 1900 that kicks ass.
It's a total-immersion approach to print identification that uses original examples of all the different processes. I took it a couple years ago and it rocked.
BTW, ~excellent~ examples used in your two-parter. That drypoint is sporting a pretty monumental mustache.